When you are starting your adventure with git, it’s hard to know everything from the beginning. This is normal that you do small steps and discover new features on the way. Today, I have a very nice git feature for you. It will allow you to have a better structure and order of your commits. This is very useful especially when you work in a team. I will show you how to use git rebase. This is the third article in the git series, so if you want to know more about basics of git usage, go to my previous articles.
Git merge
Normally, when you start working with branches, you will just use git merge command. This will allow you to combine your changes with the main branch. It’s OK. You achieve what you want to. Your branch is merged with the main branch. But, what you could notice too, is that the changes are in a very strange order. They aren’t grouped by context. They are grouped by date. In some cases it’s a good solution, but not here.
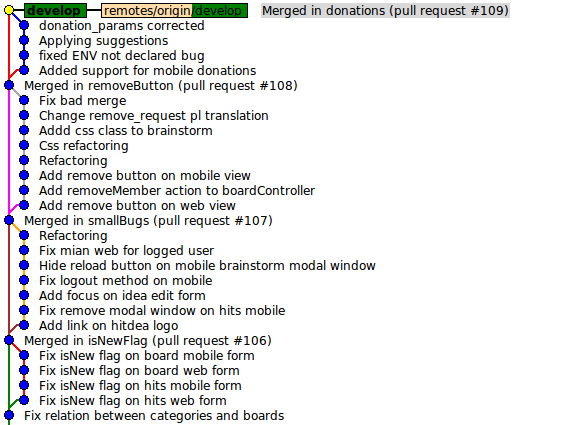
Imagine that you need to implement login functionality. You create pure HTML as one commit. In the second commit, you add communication with the backend. Everything is working, so you decide to merge those changes with the master branch. In the meantime, your team did other tasks. After combining all changes, one of your commits is on top of the git tree and one somewhere in a middle. It’s very hard to reproduce the way of thinking or the implementation steps for a specific feature. In this case, git tree can look like this:

You can see that even you have some connected commits, after the merge, it looks like one big mess. The other thing is that you can see commits with the title “Merged in…”. These commits are automatically generated during the merging process.
Git rebase
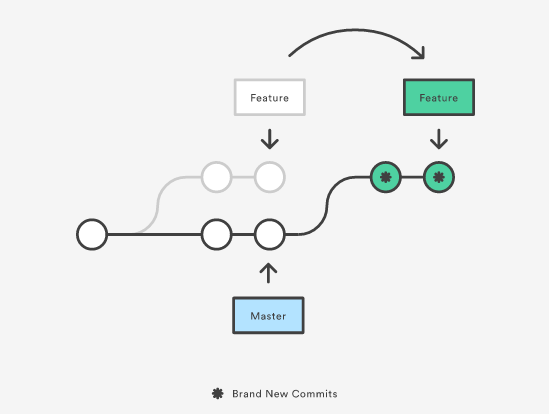
On the other hand, you have git rebase. If you are interested in order commits by logical steps, I recommend you to use git rebase command. This approach will allow you to have all of your commits as one common piece. The same will be for the rest of your team. Of course, if all of your team members will use this git rebase approach.

Here, you see everything in order. Connected commits are in one group. You also have a history of our branches.
Now it’s time to go deeper. Let’s compare git merge and git rebase with more details.
Git merge vs git rebase
When you use git merge, git will try to resolve conflicts at once. It will put all changes together in date-time order. In case there will be some conflicts, you will see them as one list. After you resolve them and commit, the merge commit will be generated. But when you use rebase, git moves your local changes to a temporary area and pull all changes from the remote repository to your branch. Then one by one it will move each of your local changes on top of the downloaded changes. We often say that rebase moves your local changes on top of the HEAD.

What is HEAD?
HEAD is a reference to the last change in the current branch. You can think about it as a marker, which tells you where you are now. If on the remote repository are changes, that you don’t have them locally, you can say that you are behind the remote HEAD. So, when you pull all changes from the remote repository, you can say that you are on top of the HEAD. It is possible to move this HEAD marker to a specific commit. In this case, you will say that your HEAD is in detached state. This means that it isn’t referring to a named branch, but only to some specific commit. This is illustrated below:
   HEAD (refers to commit 'B')
    |
    v
A---B---C---D  branch 'master' (refers to commit 'D')
How to use git rebase?
Simple git rebase scenario - no conflicts
Below, I show you an example, how you can do git rebase. We would like to rebase my-branch to last changes which are on the develop branch.
Switch to
developbranchgit checkout developDownload all changes locally
git pull developSwitch to a specific branch (branch on which you work)
git checkout my-branchRebase your branch
git rebase developPush changes to the remote repository
git push
Git rebase with conflicts
The example above is the simplest scenario, but it isn’t always so simple. Many times when you do git rebase, you have conflicts. You need to resolve them and continue the next step of the rebase. So first, you go to all files where the conflict is. You resolved them and then you add all your changes using git add command. After that, you can continue the rebase using git rebase --continue command.
git rebase develop

# resolve conflicts

git add -u # add all changes
git rebase --continue
No changes when conflicts are resolved
There are some cases when you resolved conflicts in files, but it’s no difference between what code was before and what code is now. This is the situation when you will get a message that there are no new changes. To move forward, you need to use a specific command to show that you’re aware of this. The command is:
git rebase --skip
I cannot push to the remote repository after git rebase
Probably you had already code on the remote repository before doing git rebase. No worries. This is a common situation and there is a simple solution for that. But before I show you this solution, I want you to understand why you cannot push. When you do git rebase, as we discussed it already, git moves your local changes to a temporary area and then one by one git adds those changes on top of your branch. When this happens, your code stays the same, but you get new IDs for all your commit. So, you have a difference between IDs on the remote repository and your local branch. Git is confused. It cannot find the dependency which commits are already on the remote branch and which not. This is because you completely overwrote the history of your changes. You added some commits from a different branch before your commits on the current branch. To resolve that situation you need to force overwrite of the remote history. To do that, you will use:
git push -f origin my-branch
When you do this, you need to be careful. If something went wrong during the git rebase, for example, you resolve conflicts in the wrong way, you can lose some of your changes from the branch. In case you work on the branch alone, you should be pretty safe. But when the same branch is used by many people, it can provide some troubles.
How to abort git rebase?
If you would like to abort git rebase, just use the abort option:
git rebase --abort
Other articles in this series:
- What git tool is?
- Basic commands in git
- How to replace parent branch in git?
- How to use git rebase –onto?
If you want more information about the git tool, you can also check out the Git documentation.
Need help?
If you're looking for a Ruby developer with over a decade of experience, don't hesitate to contact me.
I have experience in a variety of domains, with a focus on short user feedback loops and teamwork. I can help you build a great product.
Woman on Rails Newsletter
Join a community of like-minded readers and receive my short, insightful emails on self-development, software development, productivity, and team management. Plus, from time to time, I'll share personal insights and stories from the IT world.
